9.1 Introduction
Forbes Accounts is a powerful yet simple to use final accounts system for accountants.
It integrates closely with other Forbes products such as time recording, payroll, company secretarial and tax.
You may wish to consult the frequently asked questions at the end of the is document.
The system is based on a model/view architecture.
The underlying data (codelist, schedules of transactions) referred to as the “model” is kept separate from the final output, known as the “view”.
The underlying data is entered through powerful and easy to use data schedules.
Alternatively there is full two way interaction with excel.
It is then formatted using one of a number of templates to produce the final accounts.
9.2 The code list
Profit and loss statement
| Sales | 4000-4999 |
| Purchases | 5000-5999 |
| Direct Expenses | 6000-6999 |
| Overheads | 7000-7999 |
Balance sheet
| Fixed Assets | 0001-0999 |
| Current Assets | 1000-1999 |
| Current Liabilities | 2000-2299 |
| Long term liabilities | 2300-2999 |
| Capital and Reserves | 3000-3999 |
To print the full code list, go to setup in the navigation window and choose codelist.
9.3 The accounts window
To launch accounts choose start then Forbes then Accounts.
Alternatively press the accounts icon in clientbase or any other forbes package.
The Forbes accounts user interface is made up of two main windows. The navigation window to the left and the working area to the right.
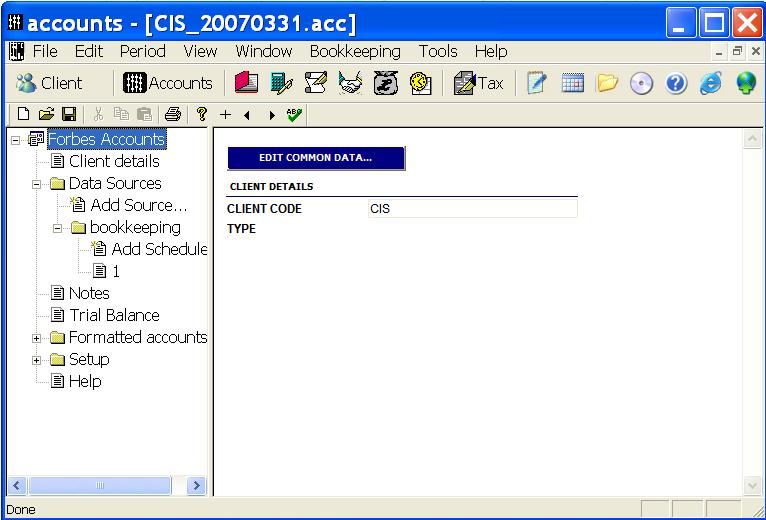
9.4 Client Data
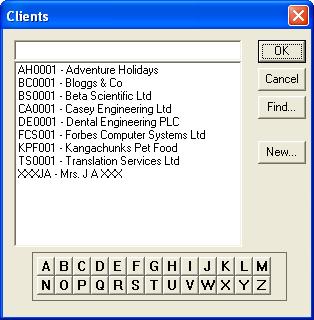
9.4.1 Creating a new accounts client
Choose File then New. Select an existing client from the client database or press new
.
You will then be prompted for further data outlined below.
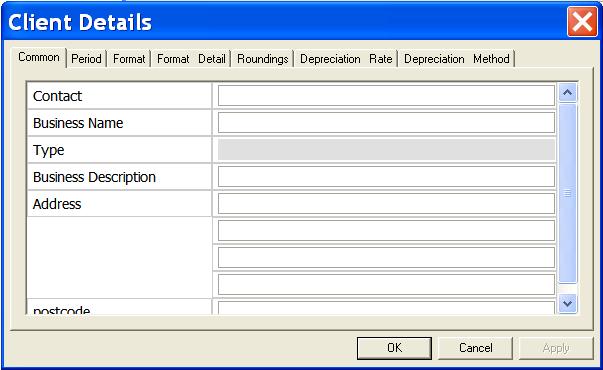
9.4.2 Edit Client Data
The client data screen will come up when you create a new accounts client or later by choosing “client data” from the navigation window.
Fill in the details
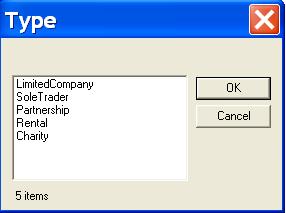
9.4.3 Business type
At any time you may change the business type under File / Set Business type
9.4.4 Partnership information
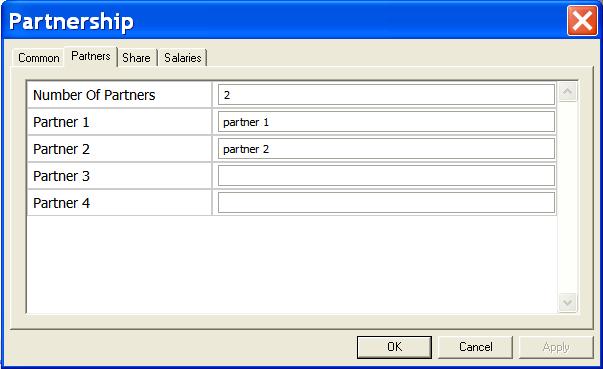
After selecting client data, there is a blue button to allow labelled partnership data.
This button is only present when the business type is set to partnership.
Pressing this button will bring you into a tabbed dialog where you can enter partners details such as names, share of profit etc.
9.4.5 Limited company information
After selecting client data, there is a blue button to allow labelled limited company data.
This button is only present when the business type is set to Limited Company.
Pressing this button will bring you into a tabbed dialog where you can enter directors details such as names, share of profit etc.
9.4.6 Formatting options
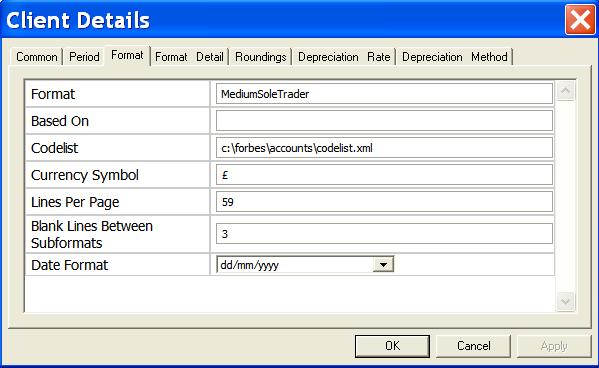
Under the Format tab you will see the basic format.
There is also a box labelled Based On which is blank by default.
If you enter a client code in this box, the format will not be based on the master format but on that of the client entered here.
The currently selected codelist will be shown here.
This will default to the master codelist, but if you have edited the codelist, the path to the local copy will be shown here.
All dates are entered in the dd/mm/yyyy format.
However you may choose to display them differently from this in the final formatted accounts by changing the “Date Format” selector on this screen.
9.4.7 Data synchronisation
By default accounts synchronises its data with other Forbes packages. If you add a director or change the company address in the cosec package then it will automatically update in accounts and vice versa.
Sometimes this is undesirable, for instance when you are working on an old set of accounts. You can manually switch synchronisation off for a particular set of accounts by choosing data synchronization from the file menu.
It will have a tick next to it when it is active.
When you choose Tools/Next period to carry forward data, synchronization is automatically switched off for the old set of accounts.
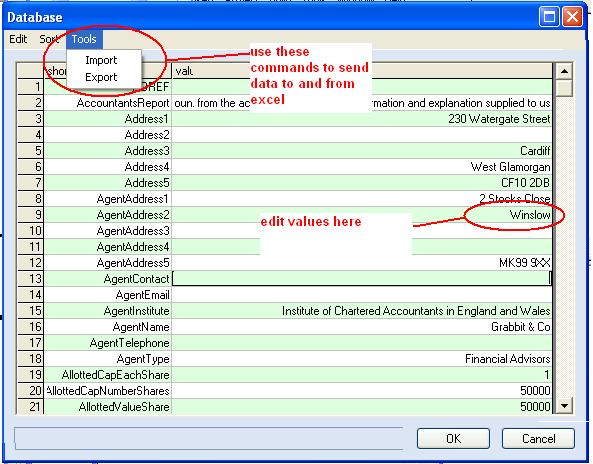
9.4.8 Full database access
To access the full database of client data choose Edit / data entry template / full database.
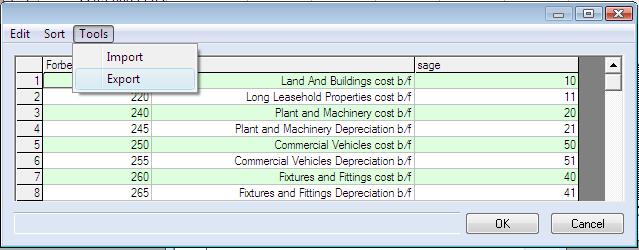
This will bring up all the data fields. You may wish to use Tool / Export and Import to transfer this information to and from excel.
9.5 Financial Data Entry
9.5.1 Introduction
Choose data sources in the navigation window.
There are a number of possible data sources. Under each you can add multiple schedules.
Under opening balances there is also direct trial balance entry.
9.5.2 Using the schedule editor
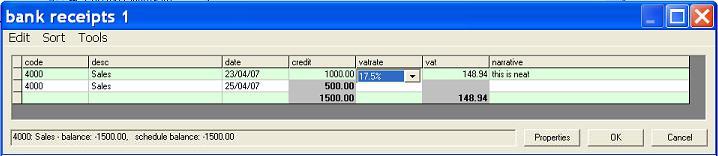
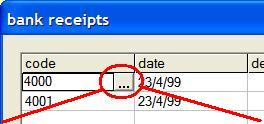
Enter the code, date, amount etc.
For the account code and various other fields, when the field is selected a .. button appears.
To override the vat figure you can enter a figure followed by an exclamation mark ‘!’.
9.5.3 Using the account selector
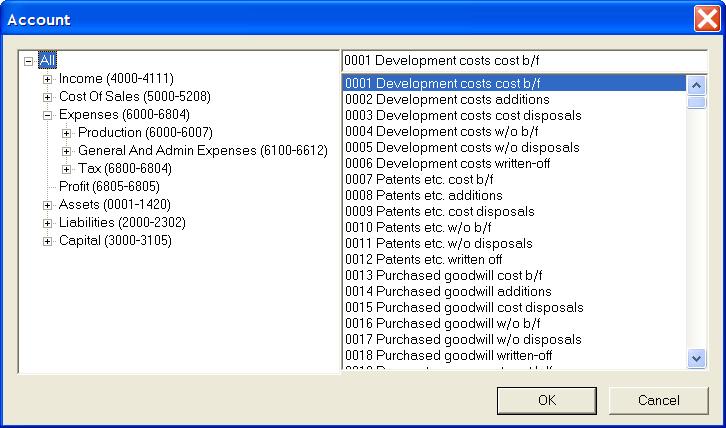
The right hand side lists all accounts. You can scroll through to find the account you want.
The left hand side of the window allows you to navigate to a particular range of accounts.
The Find button allows you to search for a piece of text e.g. “postage” in the account descriptions.
The Print button prints a hardcopy of the codelist.
The “restrict to this clients codes” check box, when ticked, restricts the list of codes shown to those currently in use or in use in the previous accounting period for the currently selected client.
9.5.4 Further commands
Properties – this allows you to specify the schedule title, total code and vat code.
Making changes here might not take effect until you exit from the schedule editor.
Under the properties button you can also specify that you want the schedule pre-populated with codes.
This may be useful if you are entering a TB directly.
Sort
Status
9.5.5 Data reports
In the view menu there are several options for summarising and reporting the financial data entered
9.5.6 Enter a comparative balance
Normally the comparative figures are brought in automatically from the previous years accounts.
If no previous years accounts exist on the system it is possible to manually enter comparative figures by choosing Comparatives from the Edit menu.
9.6 Importing and Exporting
9.6.1 Migrating data
If you are moving to Forbes Accounts from a different final accounts package you can probably migrate some or all of your data.
Go into clientbase and choose File / Import.
9.6.2 Bringing in data from Excel
The most common import of data from excel is to bring in a TB. See excel sample in the help menu for an example of doing this.
You can also import data entry schedules. To bring in a single schedule, bring up the schedule editor for the schedule (first add a new schedule if necessary).
Then choose Tools/Import.
To bring in a complete set of working papers, choose Tools/Import from the main screen.
To get started and get your excel spreadsheets in the right format, it may be best to use export to create a template.
By default the spreadsheet will be named as per the accounts datafile, but with a .xls file extension. For the example in section 9.6, the excel file would be c:forbesclientsBS0001BS0001_20050331.xls.
9.6.3 Bringing in a TB from another package
Check under File / Import to see if your package is listed. If not you can bring in data via Excel.
If you are bringing in a TB from excel see the sample in the help menu (you will also find it in the accounts folder – tbsample.xls)
The data to be imported will be coded with a particular chart of accounts.
We have build in maps from some charts of accounts such as Sage. You can also produce your own or customise the existing ones.
See section [SectionCodeListMaps].
Once you have created your code list mapping above you may use it to import TB in csv files by using Tools / Import / TB / CSV.
This will import a trial balance from a csv file and map the codes appropriately.
First you will be prompted to select the code map you have created.
Then you will be asked the columns where the data is. It defaults to expecting code in col0, any description in column 1, debit balances in column 2 and credit balances in column 3.
If you do not have a separate column for credit balances and just show them as negative you do not need to use this column.
9.6.4 QuickBooks
To bring data in from Quickbooks choose File / Import / QuickBooks.
You will be prompted to select the QuickBooks data (.QBW) file.
The first time that you do this for a particular data file, the data file must currently be loaded into the QuickBooks application.
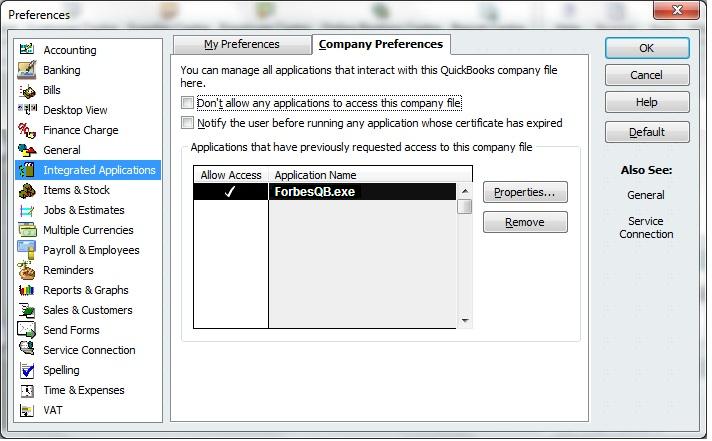
QuickBooks will display a screen asking for permission.
You may also need to allow access to our package under Edit / Preferences / Integrated Applications.
Once you have given permission QuickBooks does not need to be running to import data from that particular QuickBooks (.QBW) file.
During import, if it is a limited company (identified by the name ending in Ltd or Limited) and you have the 6 character company authentication code, then the import routing can download the registered office address, directors names etc from Companies House.
The 6 character company authentication code is the same one as you would use for Webfiling on the Companies House website.
The import will attempt to map the nominal balances using the account types and descriptions.
In QuickBooks there is also a facility to give account numbers to nominal ledgers.
You can use this to control the mapping either assigining a Forbes nominal code or for example a Sage nominal code.
The import routine will spot account numbers and ask you which chart of accounts (ours, Sage, other) the nominal codes use.
The first time you access the data file it must be on screen in Quickbooks. The import has only be tested on QB2010 full version.
9.6.5 Exporting to Excel
To export a single schedule, bring up the schedule editor for the schedule.
Then choose Tools/Export.
To export a complete set of working papers, choose Tools/Export from the main screen.
9.6.6 Code List Maps
First you must produce a code list mapping.
Use Tools / Advanced / Edit code list map.
It will produce a list of codelist mappings.
Choose [NEW]. When prompted, choose a name e.g. bloggs.
The first column is our code, the last column is your equivalent code, or maybe left blank.
If you prefer to edit this in your own spreadsheet program (e.g. excel, lotus), when you have the list on screen choose Tools then Export. After amending and saving the spreadsheet file (use Save NOT Save As), choose Tools then Import.
Next time you choose Tools / Advanced / Edit code list map, bloggs will be listed.
It is also possible to edit the map using excel.
This will bring up an empty mapping file.
You have now produced a custom mapping called blue1
You can use this when importing by selecting other then blue1
9.7 Bookkeeping
9.7.1 Overview
The bookkeeping facilities are being tested as part of the Forbes accounts package.
They are available in the Bookkeeping menu.
Once any issues have been ironed out they will be also available as a standalone package.
The basic features are :-
All the commands below refer to the bookkeeping menu within Forbes Accounts.
9.7.2 Bank reconciliation
To reconcile the information in the data sources against bank statements, choose Bank Reconciliation.
You will be prompted to select a data source (e.g. all bank receipts) or a single schedule within that data source.
The transactions will be listed and you can tick the check box to indicate they are reconciled.
After pressing OK, by default reconciled transactions are hidden.
This behaviour can be modified using Tools / USer Setup / Advanced / hide reconciled.
9.7.3 Sales ledger
You can bulk edit the sales ledger by selecting “Sales Ledger”.
Alternatively on a day to day basis use raise invoices and allocate payments as detailed below.
9.7.4 Purchase ledger
You can bulk edit the purchase ledger by selecting “Purchase Ledger”.
Alternatively on a day to day basis use enter purchase invoices and allocate payments as detailed below.
9.7.5 Invoice generation
From the invoice sub-menu choose “Raise”.
To print an earlier invoice choose “View”.
9.7.6 Allocating receipts against invoices
Choose the receipt command.
9.7.7 Allocating payments against invoices
Choose the payment command.
9.7.8 Maintaining databases of suppliers and customers
From the menu select database editor then suppliers or customers. Alternatively you can just add suppliers and customers as you go along.
9.7.9 Reporting
There are various reports available in the Reports sub-menu.
9.7.10 Updating the final accounts
Choose “Update final Accounts”. Re-run the trial balance.
9.8 Trial balance
9.8.1 Viewing a trial balance
Click on trial balance in the navigation window
9.8.2 Data drill down
In the trial balance click on the account code to take you to a summary of the data making up that account.
Clicking on an entry in the account summary will take you to the data entry schedule.
9.9 File Structure
9.9.1 Data Files
The data files are stored to the client folder.
For instance, if the client code is BS0001 then the client folder by default would be c:forbesclientsBS0001.
If under Tools / user setup / advanced you have changed the client folder to say x:mydata then this clients folder will be x:mydataBS0001.
Client codes should be restricted to 10 characters and contain only letters (A-Z) and numbers.
Within the client folder will be a master file (also known as a period list), in this example BS0001.acc and separate year end files, one per year end.
For instance if the year end was 31st March, there may be BS0001_20040331.acc,BS0001_20050331.acc etc.
The master file just contains a list of period files. e.g. BS0001.acc would contain just
It contains no data itself, only a list of data files.
When you select a client using the client button it opens this master .acc file.
If there is more than one period listed it asks you to select one.
This is the recommended way of going into forbes accounts.
It is not recommended normally to go directly into one of the accounting periods not via the master period list.
The master .acc file, also known as a period list, can be manually edited.
This may be done by choosing Edit Period List from the period menu.
Normally the period list is maintained automatically when you carry forward to new periods, insert earlier periods etc through the edit menu.
It is important that the file names of the individual data files – e.g. BS0001_20050331.acc – match up with the defined periods within them.
For example if you go into BS0001_20050331.acc and then go to period under client details then the period end date must be 31/3/2005.
When you open a data file this conistency will be checked and a warning displayed if either the list of periods (master .acc file) or any of the individual data files do not match.
The data file that you are currently working on is displayed in the title bar at the top of the screen.
In this example we are currently working on BS0001_20090331.acc.
The asterisk (*) after the file name indicates changes have been made to the data since it was opened and therefore the file needs to be saved when you exit.
9.9.2 Transferring tax data
Every time you display a trial balance the tax figures are recalculated.
To import into ProTax, bring up the self employed pages, partnership return or CT600 and choose File then Import, from Forbes Accounts.
For CT, in the accounts package, press the tax button on the toolbar. This will bring up an adjusted profit computation.
Alternatively you can transfer tax data to ProTax and other tax software such as PTP or Drummohr, via the clipboard.
To do this, choose Tools / Copy tax data to clipboard.
In ProTax, bring up the self employed pages and choose Edit then Paste boxes.
If you are using different suppliers tax software, follow their instructions for bringing in accounts data from the clipboard.
Disallowable amounts and percentages can be set in the code list editor. See section 10.1.
9.10 Disclosure formatting
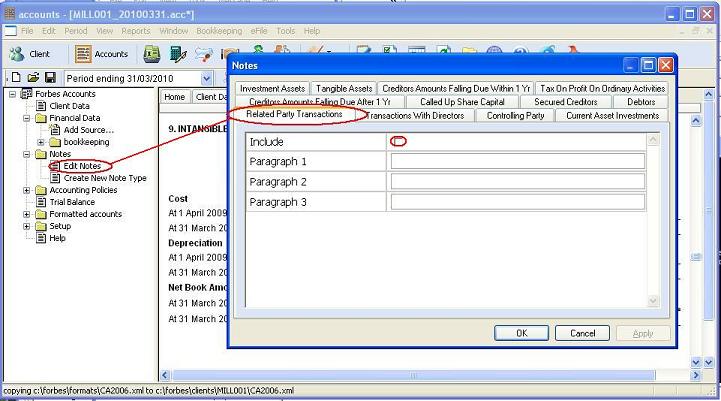
9.10.1 Notes
You can edit text notes (or add text to existing notes) using Notes/Edit.
You can also create your own text notes using Notes/Create.
9.10.2 Disclosure level
Opinions vary on the appropriate level of disclosure in Limited Company Accounts.
Under Tools > User Setup > Format you can set a disclosure level.
This is a number 1-10 inclusive. The lower the number the lower the disclosure level.
The following list will change in duwe course:
These are general settings it is still possible to exclude specific notes for a particular set of accounts.
9.11 Producing the final accounts
9.11.1 Introduction
Click on formatted accounts in the navigation window
9.11.2 Pagination and printing
iXBRL is based on HTML which is not really designed for printed output and pagination can sometimes be problematic. The space available is the physical size of the paper, less any margins. The amount of space you try to use is dependent on number of lines, line heioght and font size. Problems are due to attempting to fit more on a page than there is space.
Reducing the margins to allow more space and/or reducing the number of lines you attempt to put on a page solves most problems.
Reducing the height of blank lines to say 2mm may help.

Where you have a long custom directors report that you have edited using Edit / Report you can explicitly add page breaks. In the same way that you add sections, you can add page breaks. You can move these up and down the report.
9.11.3 Producing PDF output
Our software includes a basic pdf output mechanism under File / export as pdf, however it will not be as good as you get from commercial (including the many free) pdf drivers. For the best quality output, install one of these (such as www.primopdf.com, cutePDF etc.), and choose File / print.
9.11.4 Manually editing the output
It is possible to manually edit the resulting accounts by choosing Tools / Edit.
It is strongy recommended that you choose Tools / User /Setup / Advanced / Use report designer.
If you use report designer it will keep not of the changes that you have made and reapply them if you regenerate the accounts.
It is also possible to change the templates that are used to generate the accounts.
This is covered in “modify the formats” below.
9.11.5 Drill down
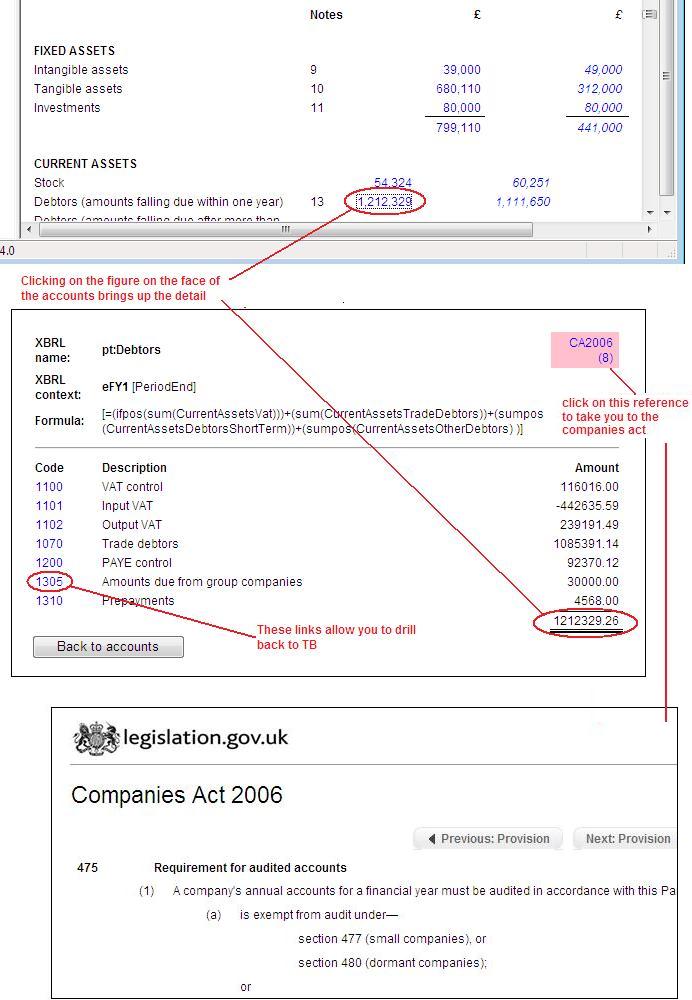
On the face of the accounts items that appear in blue can be clicked on to drill down to see how the figure was derived.
If no items appear in blue, make sure “drill down” is ticked under Tools / User Setup / Advanced.
Currently this facility is only available for limited company accounts.
9.11.6 Locking the final accounts
If it is going to be a considerable time between producing the accounts and filing them, or if they are particularly sensitive, you can choose File / Lock.
This will prevent changes in data or formats or updates to the programme affecting the output file.
If you subsequently realise that you do need to make changes, choosing File > Lock again will unlock the file.
If you have unlocked the file, made changes and regenerated the output you may want to see what the impact of those changes use View / Differences since last locked
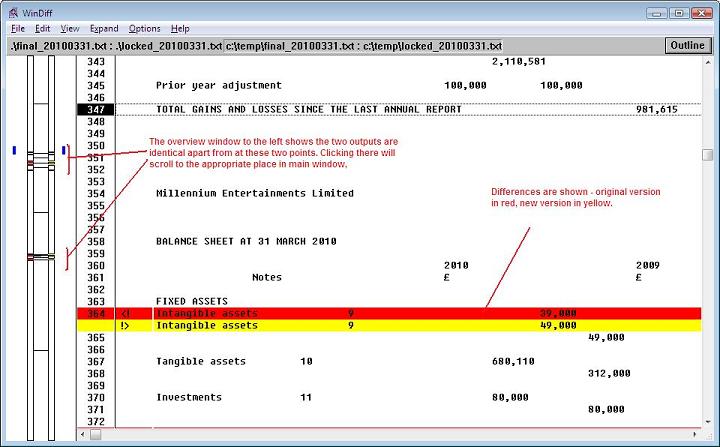
You can navigate around the “Differences” display using the mouse or F7 and F8 on the keyboard.
The window to the left shows a graphical overview of the two files.
The window to the right the merged contents showing differences.
9.12 HMRC inline XBRL
9.12.1 Tagging
The accounts are automatically tagged as they are produced.
9.12.2 Attaching the accounts to a CT600
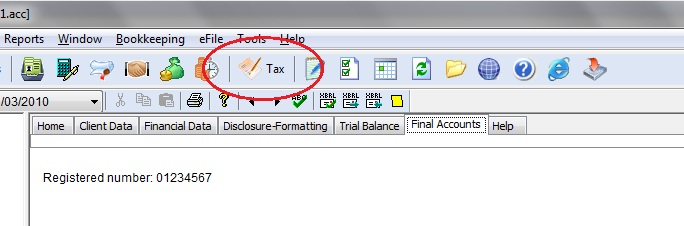
After producing the final accounts, press the tax button.
You will be guided through the capital allowances and adjusted profit computation – see chapter 5 for more details.
The accounts and computation will be automatically attached to the return.
9.12.3 Troubleshooting
Inconsistent values
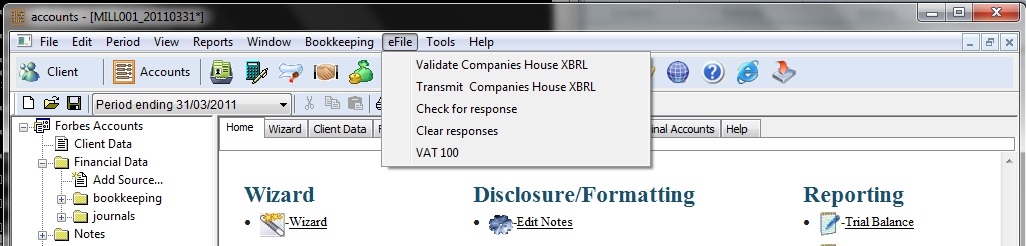
9.13 Companies House XBRL/iXBRL
9.13.1 Introduction
Companies House supports two formats for electronic filing of accounts XBRL (since 2005) and iXBRL (since 2010).
The original method is available by hcoosing “abbreviated accounts” from the main final accounts options.
The iXBRL method is available by choosing other formats and options then “abbreviated CA2006″
9.13.2 Validation
efile / validate takes to a Companies House web page that allows you to upload an XBRL or iXBRL file to validate it.
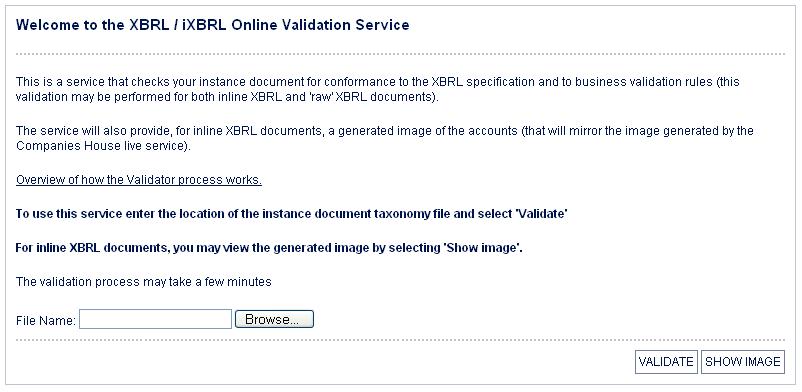
This step is not necessary, but you may want to do it to check the accounts before presenting the for signature.
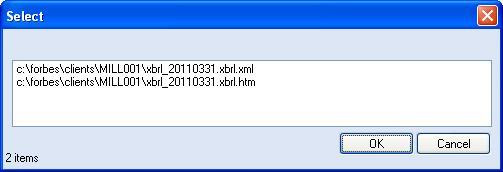
You will need to use the browse button select the xbrl file from the client subfolder. The for a 31/03/2011 year end file will be called xbrl_20110331.xbrl.
It will have:-
Once you have selected the file you can use the validate button to check it. For an iXBRL file you can use the show image button to see how it will be displayed on CH website.
9.13.3 Transmission
Choose efile / transmit
If both an iXBRL file (.htm) and XBRL file (.xml) you will be presented with the following screen allowing you to choose which one you want to send.
You will be prompted to enter the presenter id and presenter authentication for your companies house account and the 6 character company authentication code for the company in question. The 6 digit company authentication code will be the same as for webfiling.
If you do not have an 11 digit presenter id and a 12 character presenter authentication code (these will not be the same authentication information as used when webfiling) you will need to obtain these from Companies House, through the Contact Centre initially either by email to
enquiries@companies-house.gov.uk
or by telephone 0303 1234 500 to request your Presenter ID and Presenter Authentication code linked to your Electronic Filing Account.
If you have not filed using CH website you must open a new “Software filing account”
If you get an error 502 on transmission, it is these authentication items that are in error.
You must check for responses – see next section for details.
9.13.4 Response
If there are no errors reported at transmission time the accounts will be queued up at Companies House for manual inspection.
Wait 2-3 hours and then choose efile / check for response. If you get an error indicating there are no documents available for download, then this just indicates that it has not been checked yet.
9.14 Multiple periods
9.14.1 Carry forward to next period
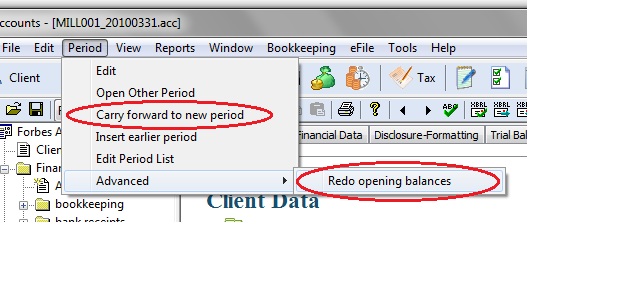
Choose Period then Carry forward to new period. This start a new period beginning directly after the existing one.
The current balance sheet will become the opening balances of the next period.
Where entries have no carried forward attribute (see editing the codelist), the balance will be carry forward to the same code.
Where a carry forward code is specified, the balance will be carried to that account.
9.14.2 Viewing a previous period
Choose Period then Open Other Period
9.14.3 Opening balances
When you carry forward to a new period the closing balances of the previous period will automatically be brought in as the opening balances.
You may view or edit the balances in the Financial Data entry section.
If changes are made to the previous accounts, or for any other reason, you wish to recreate the opening balance schedule from the closing balances of the previous period, go to the period menu and choose advanced and then redo opening balances.
If you have added data entry schedules to Opening balances these will be deleted if you redo opening balances.
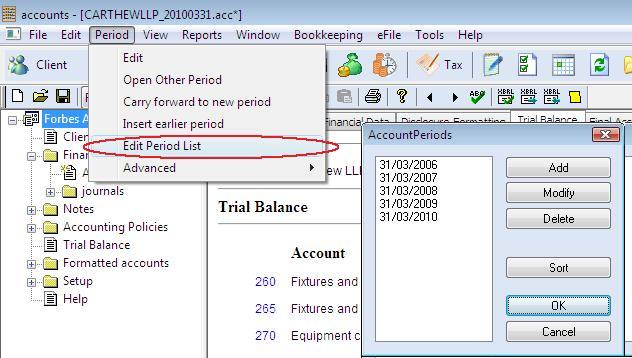
9.14.4 Editing the period list
Normally the period list is maintained automatically when you carry forward to new periods, insert earlier periods etc through the edit menu.
If for any reason the list of periods is wrong it can be manually edited. This may be done by choosing Edit Period List from the period menu.
Use add, modify, delete and sort to amend the periods listed.
9.15 Modifying the codelist
9.15.1 Modifying the codelist
Bring up the codelist browser under setup. Select the account of interest and press the Edit button
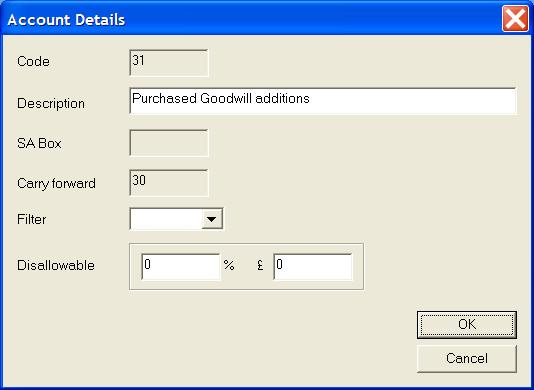
You may also enter here any disallowable amounts and percentages.
If you enter both an absolute amount and a percentage, the percentage is applied to the account balance and then the absolute amount added.
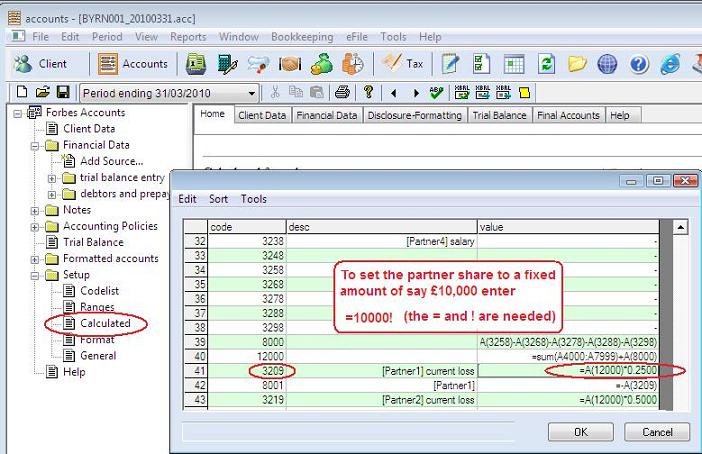
9.15.2 Calculated accounts
There are a number of accounts that are calculated based on data in other accounts.
These may be viewed and/or modified by choosing setup then calculated.
9.15.3 Roundings
When the accounts are prepared, the figures are rounded.
The roundings are transferred to the rounding accounts.
These are specified under client details / roundings.
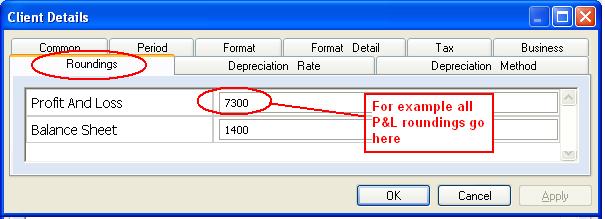
Avoid fixed asset (1-1000), stock (1000-1060) and reserves (3000-3999) as this could result in differences with the comparatives.
Using income codes (4000-4100) could result in differences between the accounts and tax forms.
If the selected nominal codes have no balances then this would produce odd looking accounts so the software will try to find approriate alternatives.
In the past this might have resulted in codes in the above unrecommended ranges being selected.
A further area where rounding can be an issue is carry forward of depreciation of fixed assets.
It is unavoidable that sometimes when you compare the correctly rounded carried forward figure plus the correctly rounded depreciation figure is £1 different to the closing figure in the comparatives.
For example you might end up with £801 in the carried forward, £200 in the depreciation, but £1000 in the comparatives (which is not equal to £801 + £200).
This will result in a warning screen coming up when you format the final accounts.
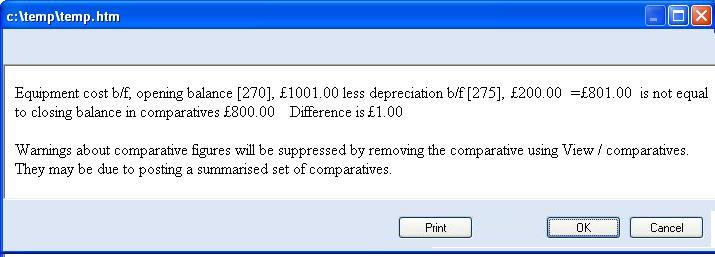
In the past this would not have mattered, but with XBRL and iXBRL it will result in an error.
To resolve this issue journal £1 from the asset to either to or from say bank or trade debtors, e.g. from [270] to [1400].
9.15.4 Favourites
You may wish to restrict the extensive chart of accounts/codelist to a smaller subset.
Choose edit / favourite nominal codes.
You will be given 3 choices:
Normally you will use the first choice. Once you have selected favourites it will be used for the TB in the wizard (if you are already on the wizard TB you will need move off and come back) and in the nominal code picker used in the data entry schedules, if you tick “favourites” the list of nominal codes will be restricted to the favourites.
9.16 Further details
9.16.1 Limited by guarantee
Fill in the by guarantee section under client data / limited company / by guarantee
You will then need to include the note by choose edit / subformats excluded and removing the tick from limited by guarantee.
If this option does not appear you may need to choose edit / revert to master formats.
If you want to change the wording of “Shareholders’ funds” on the balance sheet, you can do this after producing the final accounts on screen by choosing edit/advanced/other.
If you regenerate the accounts the text will revert to the standard wording. To change it permanently for the particular client, choose tools / edit.
9.16.2 Revaluation reserve
There are two nominal codes for revaluation reserve 3005 and 3006.
You may amend the description of these codes but we recommend you use 3005 for the c/f figure and 3006 for in year movements.
For example if a property is revalued, debit 213 and credit 3006.
If you wish to transfer amounts from the revaluation reserve to the profit and loss reserve debit 3006 and credit 7958.
9.16.3 Fixed partnership shares
If you want to set the partner’s share explicitly edited the calculated amount.
9.16.4 Foreign currency accounts
You can set the currency symbol under client data / edit common data / format.
For CT the adjusted profit computation will be in GBP. To set the exchange rate from the accounts currency to GBP use client data / edit limited company data / CT / exchange rate.
Once the accounts are attached to the CT return you will need to change the XBRL tagging currency. This is done by choosing ixbrl / advanced / Change currency. Check the summary correctly reflects the chosen currency.
9.16.5 Variable length periods
Where the accounting period regularly varies from 52 to 53 weeks around an average of one year for CT purposes, for example if the accounts are always made up to a Friday, then they can be treated as annual accounts for CT purposes.
Use Period / advanced / variable length period.
If this is completed then the dates entered here will be used on the CT return and no splitting will occur.
9.16.6 Disclosure nominal accounts
Nominal accounts 9001-9999 do not appear on the balance sheet or profit and loss and are for used for:-
In order for the TB to balance, you should also use 9999 – the disclosure balancing account. If you are using a journal or TB entry for these figures you will need to manually post to this account. If you are using a”disclosures” (last item in the choice of data source types) the balancing entry to 9999 will be automatic.
9.16.7 STRGL – statement of recognised gains and losses
The STRGL is produced by posting to nominal codes 9201-9205 and a balancing amount to 9999. See the section “Disclosure nominal codes” above.
9.17 Charities
9.17.1 Introduction
9.17.2 Chart of accounts
The nominal code list or “chart of accounts” for charities is slightly different from other entities.
| Charity Funds | 3200-3999 | ||||
| Brought Forward | 3200 | ||||
| Incoming Resources | 3201 | ||||
| Outgoing Resources | 3202 | ||||
| Transfers | 3203 | ||||
| Incoming Resources | 4000-4999 | ||||
| From Generated Funds | 4400-4799 | ||||
| Voluntary Income | 4400-4599 | ||||
| Grants | 4400-4439 | ||||
| Donations | 4440-4479 | ||||
| Sponsorship | 4480-4519 | ||||
| Other | 4520-4559 | ||||
| Other | 4560-4599 | ||||
| Activities For Generating Funds | 4600-4699 | ||||
| Grants | 4600-4619 | ||||
| Donations | 4620-4639 | ||||
| Sponsorship | 4640-4659 | ||||
| Other | 4660-4679 | ||||
| Other | 4680-4699 | ||||
| Investment Income | 4100-4199 | ||||
| Investment income | 4100-4199 | ||||
| From Charitable Activities | 4000-4099 | ||||
| Charitable Activity | 4000-4019 | ||||
| Charitable Activity 2 | 4020-4039 | ||||
| Charitable Activity 3 | 4040-4059 | ||||
| Charitable Activity 4 | 4060-4079 | ||||
| Charitable Activity 5 | 4080-4099 | ||||
| Other Incoming Resources | 4800-4999 | ||||
| Resources Expended | 5000-7899 | ||||
| Costs Of Generating Funds | 5000-5999 | ||||
| Costs Of Generating Voluntary Income | 5000-5199 | ||||
| Fundraising Trading Costs | 5200-5399 | ||||
| Investment Management Costs | 5400-5699 | ||||
| Charitable Activities | 7000-7899 | ||||
| Governance Costs | 6000-6999 |
9.17.3 Funds and Sub-Codes
The charity chart of accounts also uses subcodes for the funds and charitable activities.
| Unrestricted Funds | 1-19 | ||||
| Unrestricted Funds General | 1 | ||||
| Unrestricted Funds Designated | 2-19 | ||||
| Restricted Funds | 20-59 | ||||
| Restricted Income Funds | 20-39 | ||||
| Endowment Funds | 40-59 | ||||
| Endowment Funds Expendable | 40-49 | ||||
| Endowment Funds Permanent | 50-59 |
For example 4400 as grants and the standard chart of accounts gives 7525 as sundry expenses.
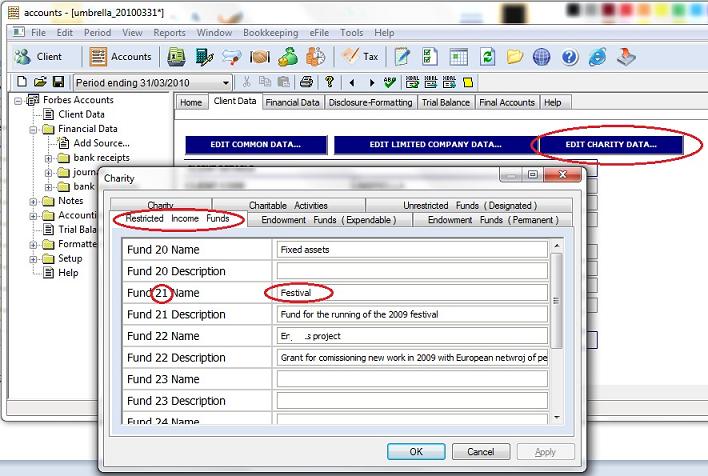
The names and descriptions of the funds can be set up under client details / edit charity data.
9.17.4 Charitiable Activities
set up the the list under client details / edit charity data.
9.17.5 Incorporated versus unincorporated
The formats will vary depending on whether the company number is completed under company details.
9.17.6 Chairman’s Report
This is excluded by default. Use Edit / Subformats excluded and remove the tick.
To edit the text of the report choose Edit / Report – see 9.18.2 below
9.17.7 Trustee’s Report
To edit the text of the report choose Edit / Report – see 9.18.2 below
9.17.8 Auditor’s Report
To edit the text of the report choose Edit / Report – see 9.18.2 below
9.17.9 Independant Examiners ‘s Report
This is excluded by default. Use Edit / Subformats excluded and remove the tick.
To edit the text of the report choose Edit / Report – see 9.18.2 below
9.18 Modifying the formats
9.18.1 Introduction
Forbes accounts is a format based accounting system.
The underling nominal balances are taken to produce a final set of accounts based on a template referred to as a “format”.
The format currently in use is specified under Client Details then Format.
9.18.2 The Report Editor
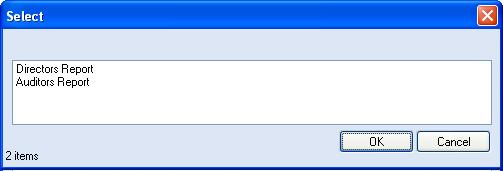
Some parts of the accounts such as directors’s report are mainly text based have a special editor associated with them. Choose Edit / Report. You will be given a list of suitable templates to edit.
Select the subformat that you are interested in an then you will be given a list of sections within that report.
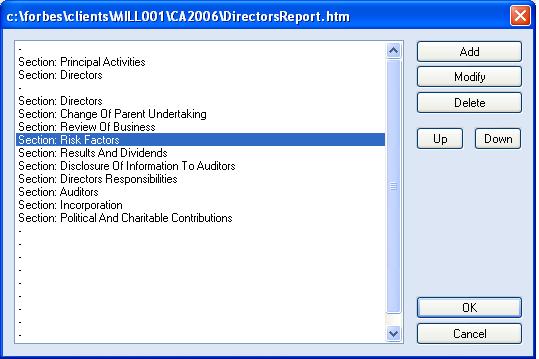
You can modify sections, add new sections and delete sections using Add, Modifiy and Delete. Double clicking is the same as pressing the Modify button. You can change the order of the sections (including any you have added) using the Up and Down buttons.
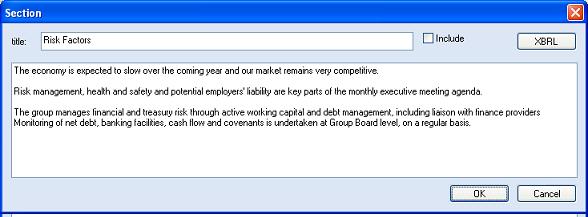
When modifying a section you can change the title and text. The text should be entered without line breaks. Line breaks are used to indicate new paragraphs.
9.18.3 Changing the order of the subformats
You can change the order of the subformats. This is generally to move a policy or note to be earlier or later in the accounts. Use edit / subformat ordering. They will be automatically renumbered.
9.18.4 Editing a format
In the navigation window choose Setup then Formats.
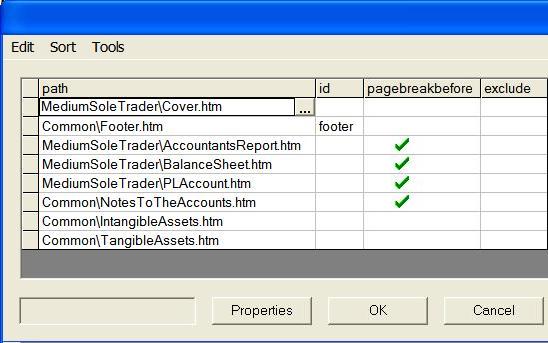
This will take you to an overview of the format, listing all the subformats making up the complete set of accounts.
Click on the one you are interested in and press the […] button.
You will see the format on screen.
See section 9.11.16 for how to add a new subformat to an existing format.
See section 9.11.17on how to create a completely you new format of accounts.
9.18.5 Format overview
The format consists of a number of columns.
The first column, that appears in red, is referred to as the control column.
The remaining columns are the data columns.
There is a special data column referred to as the comparative column.
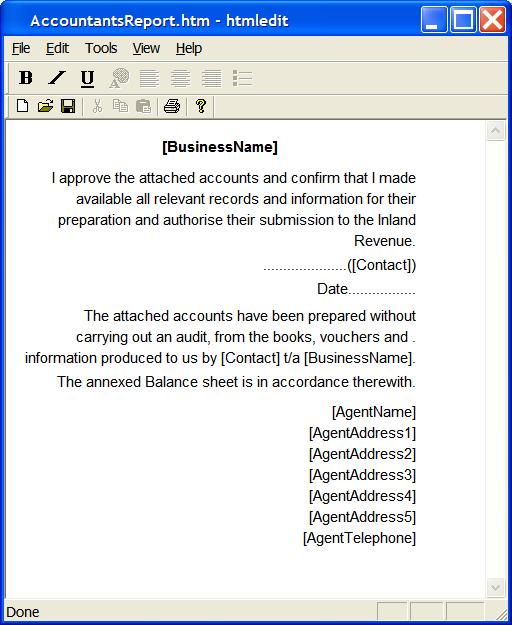
For a simple format, such as the accountants report illustrated above, the format consists solely of text and substitute fields such as [BusinessName].
9.18.6 The control column
this may contain the following commands
9.18.7 The data columns
| for example | |
| plain text | These are the accounts |
| plain text containing square bracket substitution | These are the accounts for the year to [PeriodEndDate] |
| If we doubled sales, turnover would be [=2*A(4000)] | |
| An arithmetic expression beginning with = | =A(4000) |
9.18.8 Substitute fields
These will appear in square brackets in the format. e.g. [BusinessName].
When the accounts are produced, the appropriate text will be substituted in.
The actual data is brought in from the client data screen in the navigation window.
Some examples are given in the table below. The substitution of square bracket values takes place after all other evaluation is complete.
| BusinessName | The name of the business |
| ThisYear | The heading for the current column |
| LastYear | The heading for the comparative column |
| YearEndDate | The year end date. |
For a complete list, in Forbes Accounts, go into the help menu and choose data fields.
It is also possible to put in formulae, for example [=A(4000)+A[4001])]
9.18.9 Functions
Expressions involving functions are introduced in the main layout or in [ ] entries.
If the first character of the expression is an ! then comparative figures are used in the expression.
| description(x) | the text from the description of account code x in the codelist |
| A(x) | the balance of nominal code x |
| Total() | The running subtotal of the column. If it has an option parameter to specify the column. |
| SubTotal() | The running subtotal of the column. If it has an option parameter to specify the column. |
| SubSubTotal() | The running subtotal of the column. If it has an option parameter to specify the column. |
| sum() | the sum of all the accounts in the range |
| any() | True if any of the accounts in the range has a balance |
| sumpos() | the sum of all the accounts, with positive balances, in the range. This is useful for floating accounts. |
| sumneg() | the sum of all the accounts, with negative balances, in the range |
| dbentry() | e.g. if(dbentry("Partner4")) |
| ifneg() | |
| ifpos() | The balance of the code if positive |
| LastPage(),page() | See page and note numbering below |
| setnote(),note() | See page and note numbering below |
| ! | if used directly after the =, changes all account lookup to use comparative balances |
for example =A(74)+A(73)-sum(A32:38)
9.18.10 Range names
Range names can be used in place of explicit ranges. e.g. rather than =sum(A4000:4009) you could put =A(Sales).
This makes your formats simpler to understand and more resilient to any changes in the codelist.
For a complete list of range names, choose View then Ranges
9.18.11 Conditional text
It is possible to have within the codelist and format conditional text that depends on the sign of the data.
For example {Bank account,Overdraft} will evaluate to the appropriate next.
9.18.12 Blank line suppression
For lines in the format containing arithmetic functions – e.g. =A(4000), if all functions in all columns evaluate to zero, then the whole row will be removed from the output.
9.18.13 The comparative column
Where there are comparative figures, such as on the P&L and Balance sheet, the comparative column (column 5) will be generated automatically, using formulae from column 3, but the balances from the comparative data.
9.18.14 Page and note numbering
Each time a new layout is started, the starting page number is stored.
This may be accessed through the page() function e.g. page(“TangibleAssets”).
The LastPage() function returns the page number of the last page.
Note numbering is achieved through the note() and setnote() functions.
For example note(“TangibleAssets”) returns you the note number for tangible assets.
The setnote function, e.g. setnote(“TangibleAssets”) sets the tangible assets note number to be the next available note number.
This would normally be done on tangible assets layout.
9.18.15 Special subformats
There are two special subformats, header and footer. These are utilised on the start and end of each page.
9.18.16 Making changes
Go through setup in the navigation window.
9.18.17 A brief overview of html
9.18.18 Adding a new subformat
To add a new subformat, create a new htm file in the appropriate subfolder in your formats folder.
In forbes accounts, open up a client that uses the format you want to add the subformat to.
Go into setup the formats.
Right click and choose View then source.
Add a line referencing the format.
9.18.19 Creating a completely new format
Edit forbesaccountsformats.xml and add a reference.
9.19 Frequently Asked Questions
I have the final accounts on screen – can I edit them ?
Yes, choose Tools then Edit
There is not date appearing for signing balance sheet ?
Go to the client details section in the navigation window, then choose “edit limited company data” and click on the “Directors Report” tab.
How do I hide or show the comparative column ?
Choose View then Comparatives.
How do I suppress the cashflow statement ?
Go to client details then edit common data then format details.
How do I display or hide the accountants report ?
Go to client details then edit common data then format details.
Where do I complete my practice name ?
Choose Tools / User Setup / Agent
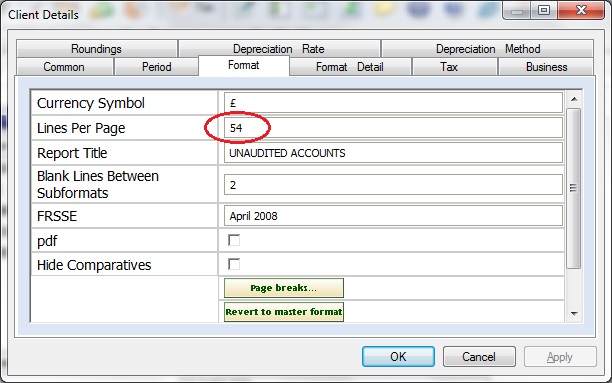
I seem to be missing a line at the bottom of the page.
The number of lines available on a page will depend on your margin settings and font sizes.
Reduce the number of lines by going to client details then edit common data then format.
How do I exclude certain sections ?
Choose Edit / Subformats excluded.
How do I duplicate narrative to save time during data entry ?
Entering ” (the double quotes character) in a cell then enter will ditto the item in the cell above (be it narrative, code, amount etc).